")
Know and understand all of the safety information that comes with your tools. If you are ever uncomfortable operating a tool don’t use the tool. By purchasing this course you are agreeing that you are responsible for your own actions and anything that may happen while you are working with tools. Woodworking is inherently dangerous. Woodwork at your own risk.
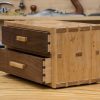
A lot is covered in this course. My objective was to make a course that not only shows you how to create a beautiful dovetailed box but it’s also full of many tips, tricks, and techniques that can be applied to any project. This course uses power tools as well as hand tools. Keep in mind that every tool I use is not a necessity. Just about every task in woodworking can be completed with various tools. Included in the course is 11 videos totaling 2 hours and 26 minutes, a PDF plan containing all of the measurements in both imperial and metric units and a layout diagram, and a SketchUp file. It’s available to be streamed while logged in with the option to download in your choice of full 4K resolution or full HD 1080.
01 – Intro and Lumber Selection (7:04)
This video covers the objective with this project course as well as selecting the lumber. We need to avoid wood knots, work around cracks, and avoid the grain itself….I’ll explain that last part in the video. Lumber selection normally comes after the design but in this case I need the design to fit into the lumber that I already have on hand.
02 – The Design (9:02)
Video 2 covers the design inspiration and the design itself. Using SketchUp allows for a great representation of the final product before we step foot in the shop and it also
allows us to easily determine exactly how much material is required.
03 – Lumber Milling (12:52)
Video 3 covers the milling process. From rough board to surfaced on all sides with power tools. My milling process is generally in this order:
- Miter saw for rough length crosscut.
- Jointer for one wide face and one narrow face.
- Planer to make the opposite wide face parallel and down to final thickness.
- Table saw rip cuts for final width.
- Table saw with a crosscut sled or miter saw for final length. A crosscut sled on the table saw is generally the better option for smaller material and material that requires greater precision.
However, there are exceptions to the rule. Such as adding an extra rip cut here and there to change the grain orientation of the final outcome of the piece (the back panel on this project)
04 – Hand Tool Introduction, Through Mortise & Tenon Shelf (36:10)
Video 4 covers an introduction to a few hand tools and techniques I used to start the joinery.
- A wheel style marking gauge and a marking knife for joinery layout.
- A blue tape layout technique.
- A Western style dovetail saw (cuts on the push stroke).
- A super-duper handy engineer or machinist square.
- A coping saw.
- Chisel style and orientation.
Those tools and techniques are shown through the process of making the through mortise and tenon joints of the middle shelf.
05 – Through Dovetail Case Corners (15:51)
Video 5 expands on the techniques from the mortise and tenon joints to create the through dovetails for the case components.
06 – Sizing The Drawer Components (9:27)
Although most projects will be assembled before sizing the drawer parts, video 6 covers sizing the drawer components. When initially sizing the drawer fronts we are shooting for a tight fit. The worst case scenario is a tight fitting drawer front that is stuck in the case and cant be removed. Sizing it before the case and back panel are assembled will allow us to remove the drawer front in the event that it gets stuck.
- Rough sizing with power tools and final sizing with hand planes and a shooting board.
07 – Back Panel Dados & The Back Panel (12:00)
Video 7 covers cutting the stopped dados for the back panel. Proper setup for the router table as well as using the appropriate router bit is very important.
08 – Assembly Prep & Case Assembly (8:43)
Video 8 covers prepping the case parts for assembly as well as the final case assembly.
- Smoothing and sanding of the exterior faces with various tools.
- Chamfering the proud joinery.
- Case assembly.
09 – Half-Blind Dovetail Drawer Fronts (11:20)
In video 9 I make a change in regards to the drawer fronts and then start the drawer joinery. There’s a speed bump along the way….
- Half-blind dovetail joinery.
- Recognizing and recovering from a process order mistake.
- Repairing a visible defect in the wood.
10 – Completing & Sizing The Drawers (16:30)
Video 10 covers the completion of the drawers and explains why wood expansion and contraction will affect how the drawer is sized.
- Through dovetails for the rear of the drawer.
- Fitting the drawer bottoms.
- Making and installing the drawer fronts.
- Drawer stop blocks.
- Fitting the drawers for a tight fit while still being easy to operate.
11 – The Feet & The Finish (7:14)
Video 11 covers the feet and the finish. The size and style of the feet on a project, as well as the finish, can have a big influence on the final appearance.
- Determining feet height.
- Making the feet.
- Finish prep and then a fool-proof shellac finish.